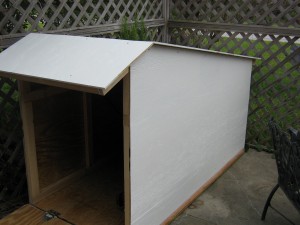
The Roof and Back – The roof comes in two pieces the long side and the short side. Where the long side and the short side connect you will need to cut about a 22 degree angle. Using a full sheet of ply wood take the measurement for the long side and add 6 inches and draw a line on a full sheet of ply wood. There are two ways to cut this angle. If you can cross cut a full sheet on plywood on you saw that works best and is straight forward cut. Otherwise you will need to use the circular saw, this can tricky. Start off supporting the full sheet on all sides, since 3/8 plywood and very flexible supporting it well is a must. You can layout 2×3’s on the ground arranging them so there is a clear path for the cut. The best way to get a straight cut is to clamp on a straight edge for the saw to follow. I have a clamp on guide, but you can use any that is straight and can be clamped on the plywood. I guess you could even tack down a 2×3. Just make sure your saw will have clearance to complete the cut without stopping.
Once you have it cut flip over the short piece and you have front part of the roof. You may have to trim, just don’t cut off the angled side.
For the long side you will need to attache all the supporting 2x3s to the roof. This will allow you to easily attach the roof. Starting at the back measure the over hang for one side and drop a chalk line or clamp on a straight edge. Now mark 16 in centers starting from the back and attach all the 2x3s to the roof except for the front one. The front supporting 2×3 will be attached to the back supporting 2×3 for the front piece. Both of these supporting 2x3s will need to be ripped at the angle of the front and back roof line. For the short side you can attach the front 2×3 support.
The back is just a basic square piece of ply wood. The back is very important to make sure it is square. The back will add most of the lateral support, by connecting the base, both sides and the top. You will notice that once you attach the back it starts to feel very stable.
The Door – The door will need to support the weight of the mower and the user. I choose to frame out the with 3/4 oak planks. Since I have many of these on hand. But you could use 2×3 or even plywood.
The Assembly – The assembly starts at the base. At the back of the base attached a 2×3 using screws so that it is flush with the base plywood. I rolled the lawn mower on to the base and to see where I could put a second support on the floor. Which would also act a as stop so the mower would not run in to the back wall.
Next put one wall in place, if you do not have a helper you can tack a 2×3 to the wall to hold it in place. The front and back of the wall should be flush with the base ply wood. Screw the wall to the back support 2×3 and then in the second support 2×3. Along the base of the wall drill 16 in center recess holes so you can screw the wall to the base. Making sure that the wall in square and firmly in place. This should be able to support the wall and you can attached the back panel.
The back panel is attached with 1 3/8 deck screws. The back is very important structurally as it will keep everything square. The back of the wall should be flush with the back panel, then attach the back panel to the wall. Then attach the back panel to the base.
Put the second wall in place and put a screw in to the back support 2×3 on the base, then attach the back panel to the second wall. Next add the screws along the bottom 2×3 attaching the wall to the base. Now add the double 2×3 that is angled for the front and back roof line and attach it to the peak of the wall.
Now you are ready for the top. Attach long side first starting at the back add the screw in to each supporting 2×3 of the roof. Attach the front part of the roof and then attach the door. You can frame out the doorway, but that will reduce the opening, but will make the front stronger.

I put on a fast thin coat of paint before assembly, but you will want at least two coats. Then paint it once a year.